 EastScape Wikibuilt from the game itself
 Charts and the Compass
 A chart is a map of somewhere you've been, at a tier from 1 to 16. Unroll it and you (and up to 3 of your party) go into a private, tougher copy of that map. Its monsters drop much more rolled gear.
On this page: Getting started · Getting a chart · How a run works · Reading a chart · The Atlas · The Compass
Getting started
- Get a chart (see below) and stand at the Chart Table in the Yard's north court with your party. Anyone in it within 3 tiles comes with you, and the card shows who before you go.
- Unroll it. A bar at the top shows your kills and the clock.
- Kill 50 in 10 minutes. On most charts, the rocks and trees are only scenery.
- Clear it: you get more charts, an Atlas mark, and you go home in 30 seconds.
Getting a chart
- Monsters drop a tier-1 chart of where they stand: 0.33% a kill, a boss 17%, a Champion three times as often.
- A clear drops more, often a tier up.
- Don't want one? Break it down at the Curio Cabinet for 2 glimmer plus its tier (three times that for an Anomaly). One at a time: Break all never takes charts.
- Draw a blank at the Chart Table: 10
 spell paper and an
 Arcane ink, tier 1 of any map or any tier you've cleared there.
How a run works
A party fights a map's worth of monsters each, and needs half as many kills again for every extra member, so each of you earns about what you would alone. Anyone in the run can hit any monster or boss.
If time runs out, the chart is used up. A death takes you out (your party carries on). A refresh or a dropped connection puts you back in, and a run lost to a server restart gives the chart back. A run pays about an eighth of normal combat xp: charts are for loot.
Reading a chart
 Click the Chart Table and pick a chart. Its card shows the tier (each one lifts the monsters toward level 125 at tier 16, so an easy map climbs faster than a hard one, and a harder map pays more per tier), the monsters' levels, danger (how much tougher its perks make them), bounty (how much more they pay), its perks, your best there, and Unroll it.
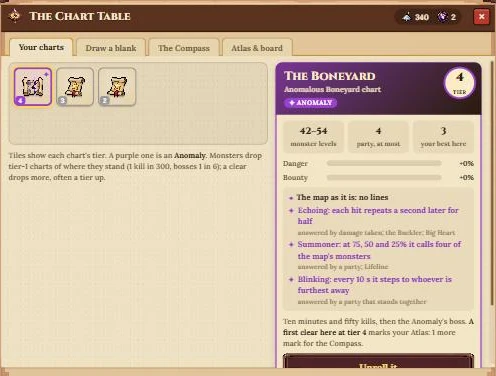
Perks include Haunted / Beast-run / Lawless (only that family), Crowded, Bossed and Twinned (the boss, once or twice), Rich (rocks and trees are live), an element perk (part of every hit is that element), Restless, Sharpshooting, Starving (food heals half), of Plenty (tickets), of Fortune (gear), of the Cartographer (charts), of the Hoard, of the Armoury and of the Toll. Charts take ink like gear.
The Atlas
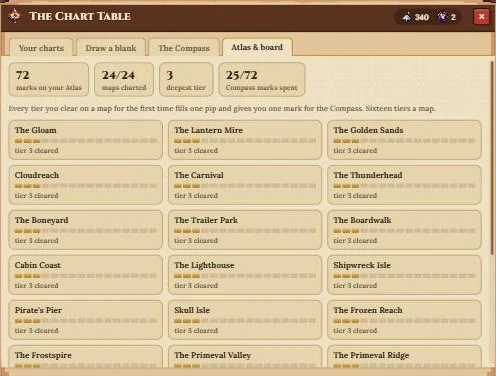
Your Atlas remembers the best tier you've cleared on every map. Each new tier is one mark: tier 6 on three maps is 18. A clear takes you at most 1 tier past your own best there, and the charts it drops you at most 1 past that, so a high-tier friend speeds you up but can't carry you to the top in one run.
The Compass
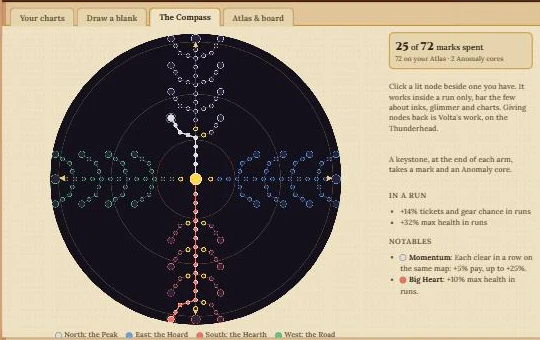
You spend marks on the Compass (the Chart Table's Compass tab), a tree of 188 nodes, 120 marks at most.
- Nodes outlined in gold can be taken now: hover to read, click to take.
- North is danger and pay, East loot, South surviving a run, West charts and Anomalies.
- Each branch ends in a notable that changes a rule, like Lifeline: your first death in a run doesn't end it.
- Each arm ends in a keystone: a mark and an
 Anomaly core.
It only works in chart runs, except for the few nodes about glimmer, inks and charts. Volta gives back a node at the edge for 500 tickets, or wipes the whole thing for 200 glimmer or a core.
More in Going further
Pets · The Long Night: Round Two · The Trailer Park · The Golden Sands · The Tower · The Carnival